
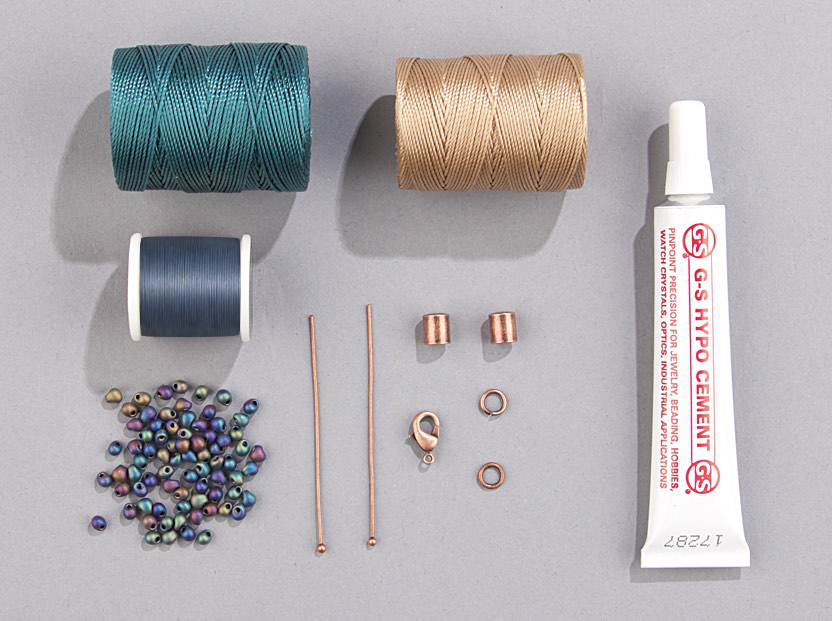
Materials:
DP-401FR: Miyuki 3.4mm Drop Matte Black AB - 1 tube
CLC-L: C-Lon Bead Cord Latte C (Color A) - 1 bobbin
CLC-CER: C-Lon Bead Cord Cerulean (Color B) - 1 bobbin
MNT-17: Miyuki Dark Blue Nylon Beading Thread - 1 bobbin
521-000: Hamanaka Kumihimo Disk
192-524-AC: 6mm Antique Copper Bead Cap - 2 pieces
192-535-AC: Antique Copper Lobster Claw - 1 piece
192-512-AC: 6mm Antique Copper Jump Ring - 2 pieces
192-530-AC: Antique Copper Headpin with 2mm Ball - 2 pieces
520-124: Hypo Cement Jewelers Glue
 Download a pdf of this project to read on your computer or tablet.
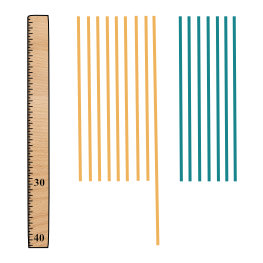
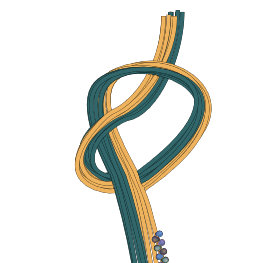
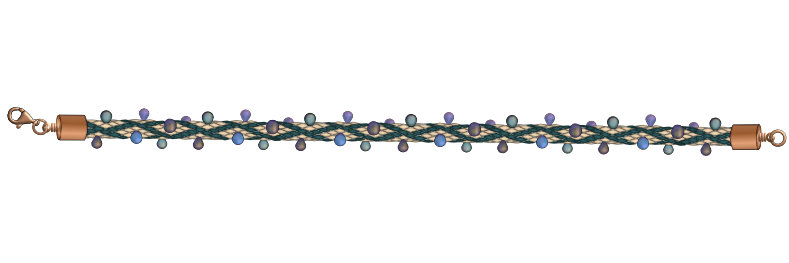
1. Cut eight 30 inch pieces and one 40 inch piece of C-Lon Bead Cord (CLC) in color A. The 40 inch length will be the only cord carrying beads. Cut seven 30 inch pieces of CLC color B for a total of 16 cords. Color A forms a diamond shape around each Drop Bead. Color B outlines color A.
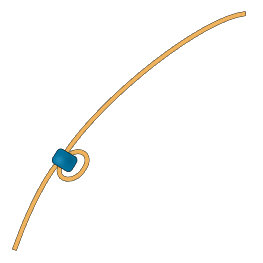
2. Attach a stop bead to one end of the 40 inch length of color A.
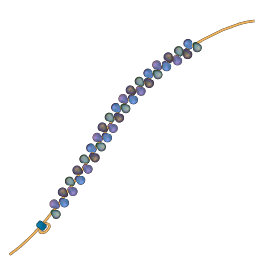
3. String 60 Miyuki 3.4mm Drop beads (DP) onto the cord. Slide the beads down until they sit just above the stop bead.
4. Working at the end opposite from the strung beads tie all 16 pieces of cord together with an overhand knot.
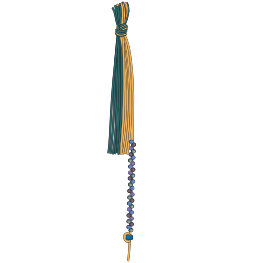
5. Pull tight to secure.
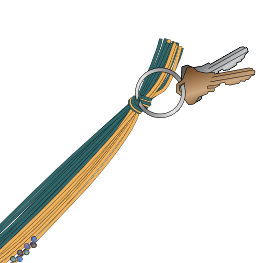
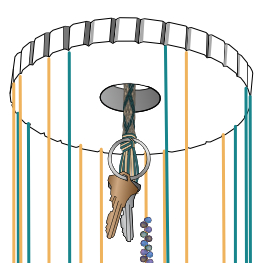
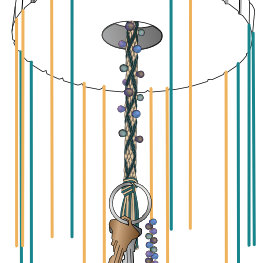
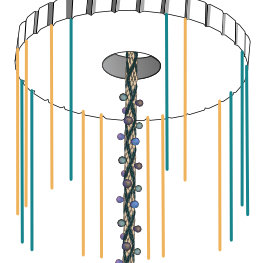
6. Use a piece of CLC to tie a weight to your knot, a set of house keys works well.
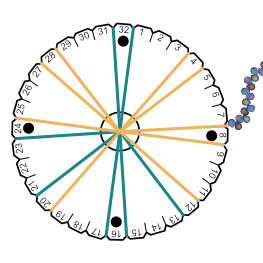
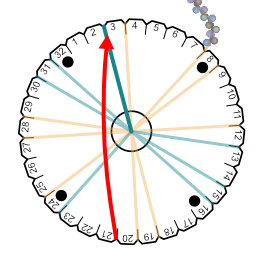
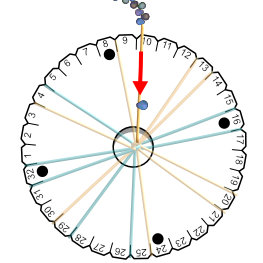
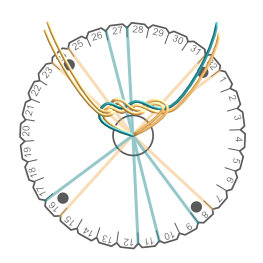
7. Place the foam disk face up with #32 at the top. With the weighted knot behind the disk pull all 16 cords up through the center opening. Each number corresponds to the slot on its left. Place the 30” color A cords into slots 4, 5, 9, 12, 20, 25, 28, and 29. Place the single 40” cord into slot 8. Place the 30” color B cords into slots 1, 13, 16, 17, 21, 24 and 32.
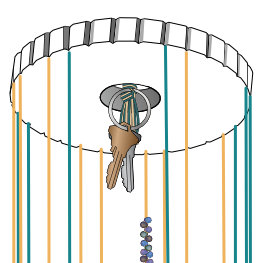
8. Once set up is complete, each cord should be in its correct starting slot. The weight should hang freely to ensure even tension. Slide the stop bead to adjust the distance between the Drops and the disk. Lower the stop bead as needed, maintaining a couple of inches of cord between the disk and beads.

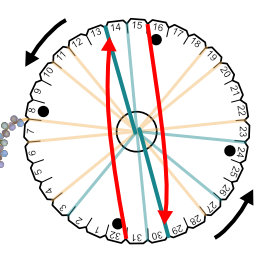
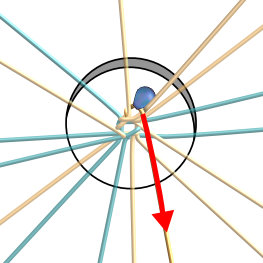
9. Bring the top right cord (slot 1) down to the right of the bottom two cords (and into slot 15).
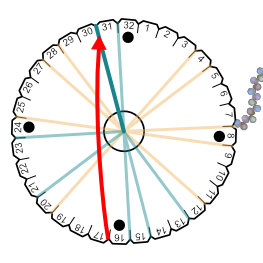
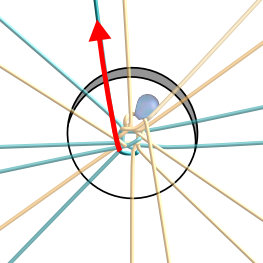
10. Bring the bottom left cord (slot 17) up to the left of the top cord (and into slot 31).
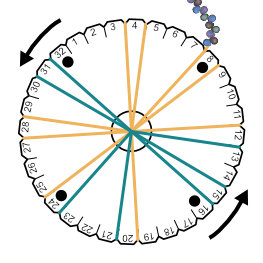
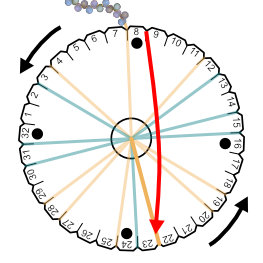
11. Turn the disk counterclockwise so that the next pair of cords are positioned at the top (slots 4 and 5).
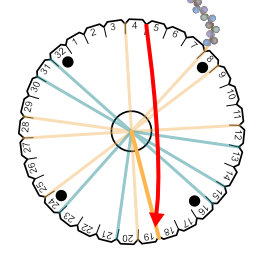
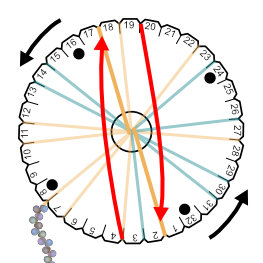
12. Bring the top right cord (slot 5) down to the right of the bottom two cords (and into slot 19).
13. Bring the bottom left cord (slot 21) up to the left of the top cord (and into slot 3).
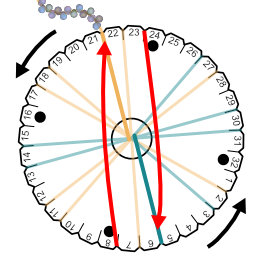
14. Turn the disk counterclockwise so that the next pair of cords are positioned at the top (slots 8 and 9). Repeat step 12 by bringing the top right cord (slot 9) down to the right of the bottom two cords (and into slot 23).
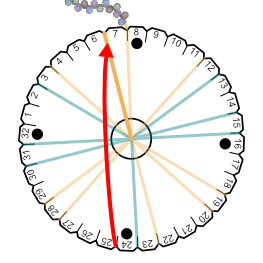
15. Repeat step 13 by bringing the bottom left cord (slot 25) up to the left of the top cord (and into slot 7).
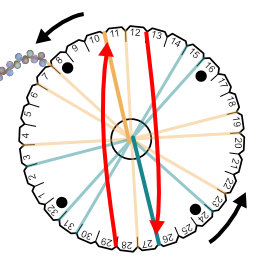
16. Turn the disk counterclockwise so that the next pair of cords are positioned at the top. Bring the top right cord down into the slot on the right of the bottom two cords. Bring the bottom left cord up into the slot on the left of the top cord.
17. Repeat step 16.
18. Repeat step 16. These same movements will be repeated throughout the braid: top right cord down, bottom left cord up, turn disk counterclockwise to the next pairs of cords.
19. Repeat step 16. The cord carrying the Drop beads is brought across the disk for the first time. Keep all the beads behind the disk as they will not be added until step 22.

20. Repeat step 16 until there is approximately 1/2 inch of braided cord.
21. Check the underside of the disk to make sure the pattern is turning out correctly. Color B should be framing diamonds of color A. If there is an error in the pattern carefully undo the braid and restart from step 7.
22. Continue braiding as before until the cord carrying the Drop beads is reached. The basic movement across the disk is the same: top right cord down, bottom left cord up. When moving the cord carrying the beads, slide one DP all the way down to the point of braiding.
23. As the cord is moved, ensure that the bead catches in the V-shape formed by the other interlacing cords.
24. Continue braiding as before, making sure the DP stays in position.
25. Continue to braid in this way, sliding on one DP each time the cord carrying them is reached. As the braided portion grows longer make sure not to let it, or the weights, rest on your work surface.
26. After all of the beads have been added, continue braiding with cord only for another 1/2 inch.
27. Remove any two opposite pairs of cords (other than the ones most recently moved) and tie a surgeon’s knot. Pull tight to secure.
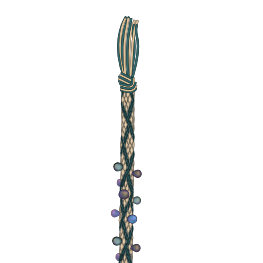
28. Remove the remaining cords from their slots. Immediately tie all 16 into an overhand knot at the base of the braid to prevent unraveling.
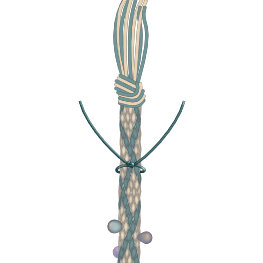
29. Cut about 12 inches of Miyuki MNT beading thread or similar. Wrap the thread around the braided cord, about 1/4 inch from the closest DP. Tie the thread around the braid in a square knot.
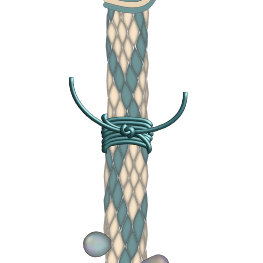
30. Wrap one end of the thread around the braid a few times and tie in a square knot. Wrap the second end in the same way and tie another square knot. Repeat once or twice more to ensure the braid is bound tightly.
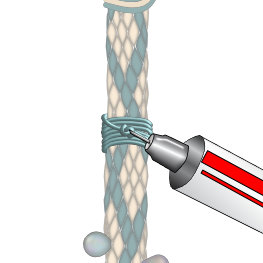
31. Place a drop of Hypo Cement on the final knot to secure.
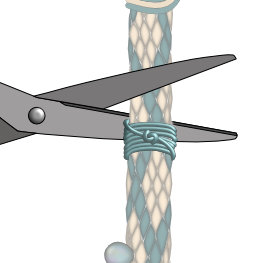
32. Cut off the end of the braid with a sharp pair of scissors, being extremely careful not to cut into the binding itself.
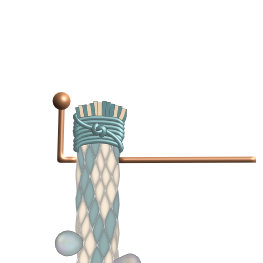
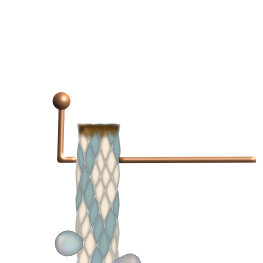
33. Take a ball pin and bend the bottom 1/4 inch over to a 90º angle. Carefully pierce the braid with the ball pin just beneath the binding. Pull the braid down the pin until it rests against the bent section.
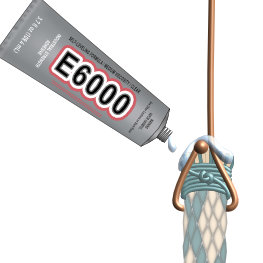
34. Bend the longer side of the ball pin up past the binding and pinch it together with the ball end to form a triangle. Center the remaining wire above this triangle. Add a drop of E6000 or Hypo Cement to the end of the braid.
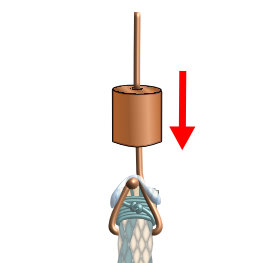
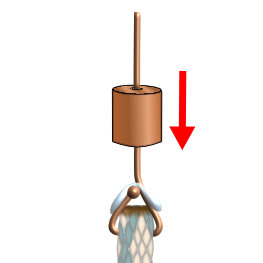
35. Slide the bead cap down the wire and over the binding.
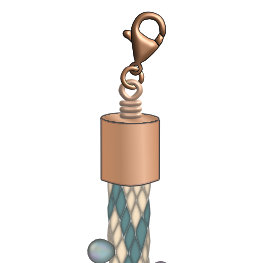
37. Use the 6mm jump ring to attach the Lobster Claw. Repeat steps 28-34 on the other end of the braid.
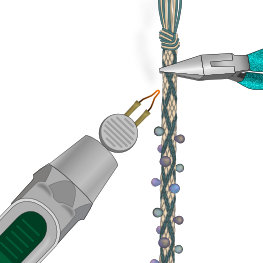
38. An alternate finishing technique employs the Super Max Wax Pen as a cord burner in place of binding the braid with thread. Use a pair of chain nose pliers to grip the end of the braid slightly below the knot. Pass the burner slowly through braid (just below the pliers) sealing the cords together. With the tip of the cord burner touch up any spots at the end of the braid that still look frayed.
39. Repeat step 33.
40. Repeat steps 34 and 35.
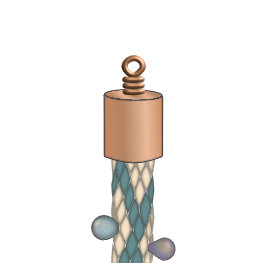
41. Repeat step 36.
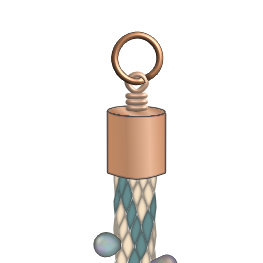
42. Attach a 6mm jump ring onto the wrapped loop.
43. This pattern will make a bangle style bracelet approximately 7.5 - 8 inches in length.
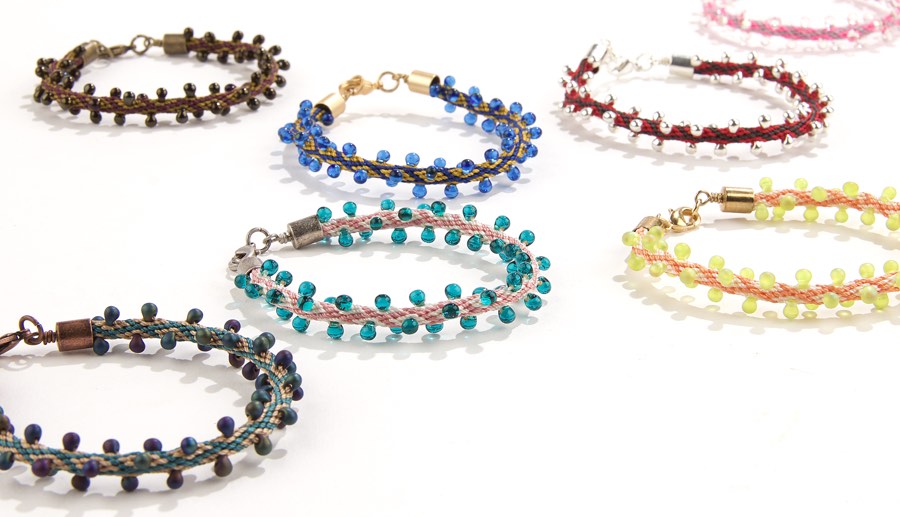
Spanish Flag
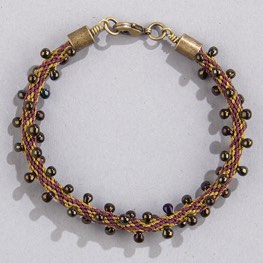
Materials:
DP-458: Miyuki 3.4mm Drop Bead Metallic Brown Iris - 1 tube
CLC-GOLV: C-Lon Bead Cord Golden Olive - 1 bobbin
CLC-EGG: C-Lon Bead Cord Eggplant - 1 bobbin
MNT-06: Miyuki Brown Nylon Beading Thread - 1 bobbin
521-000: Hamanaka Kumihimo Disk
192-524-AB: 6mm Antique Brass Bead Cap - 2 pieces
192-535-AB: Antique Brass Lobster Claw - 1 piece
192-512-AB: 6mm Antique Brass Jump Ring - 2 pieces
192-530-AB: Antique Brass Headpin with 2mm Ball - 2 pieces
Boston Ivy
Materials:
DP-143FR: Miyuki 3.4mm Drop Matte Tr Chartreuse AB - 1 tube
CLC-VA: C-Lon Bead Cord Vanilla - 1 bobbin
CLC-TN: C-Lon Bead Cord Tangerine - 1 bobbin
MNT-05: Miyuki Gold Nylon Beading Thread - 1 bobbin
521-000: Hamanaka Kumihimo Disk
192-524-G: 6mm Gold Plated Bead Cap - 2 pieces
192-535-G: Gold Plated Lobster Claw - 1 piece
192-512-G: 6mm Gold Plated Jump Ring - 2 pieces
192-530-G: Gold Plated Headpin with 2mm Ball - 2 pieces
Bougainvillea
Materials:
DP-2425: Miyuki 3.4mm Drop Bead Silverlined Teal - 1 bobbin
CLC-VA: C-Lon Bead Cord Vanilla - 1 bobbin
CLC-RS: C-Lon Bead Cord Rose - 1 bobbin
MNT-04: Miyuki Blush Nylon Beading Thread - 1 bobbin
521-000: Hamanaka Kumihimo Disk
192-524-AS: 6mm Antique Silver Bead Cap - 2 pieces
192-535-AS: Antique Silver Lobster Claw - 1 piece
192-512-AS: 6mm Antique Silver Jump Ring - 2 pieces
192-530-AS: Antique Silver Headpin with 2mm Ball - 2 pieces
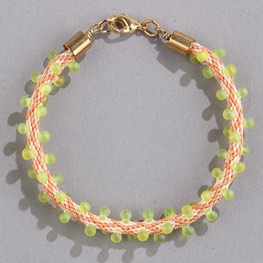
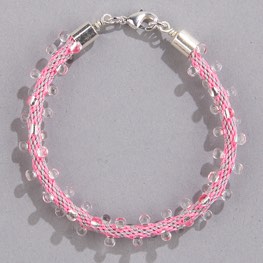
Sweet Pea
Materials:
DP-1: Miyuki 3.4mm Drop Silverlined Crystal - 1 tube
CLC-ARG: C-Lon Bead Cord Argentum - 1 bobbin
CLC-NEP: C-Lon Bead Cord Neon Pink - 1 bobbin
MNT-03: Miyuki Silver Nylon Beading Thread - 1 bobbin
521-000: Hamanaka Kumihimo Disk
192-524-S: 6mm Silver Plated Bead Cap - 2 pieces
192-535-S: Silver Plated Lobster Claw - 1 piece
192-512-S: 6mm Silver Plated Jump Ring - 2 pieces
192-530-S: Silver Plated Headpin with 2mm Ball - 2 pieces
Scarlet Runner

Materials:
DP-961: Miyuki 3.4mm Drop Bright Sterling Plated - 1 tube
CLC-SR: C-Lon Bead Cord Shanghai Red - 1 bobbin
CLC-CHA: C-Lon Bead Cord Charcoal - 1 bobbin
MNT-08: Miyuki Red Nylon Beading Thread - 1 bobbin
521-000: Hamanaka Kumihimo Disk
192-524-S: 6mm Silver Plated Bead Cap - 2 pieces
192-535-S: Silver Plated Lobster Claw - 1 piece
192-512-S: 6mm Silver Plated Jump Ring - 2 pieces
192-530-S: Silver Plated Headpin with 2mm Ball - 2 pieces
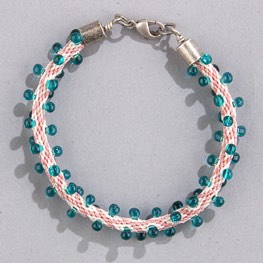
Queens Wreath

Materials:
DP-401FR: Miyuki 3.4mm Drop Matte Black AB - 1 tube
CLC-L: C-Lon Bead Cord Latte - 1 bobbin
CLC-CER: C-Lon Bead Cord Cerulean - 1 bobbin
MNT-17: Miyuki Dark Blue Nylon Beading Thread - 1 bobbin
521-000: Hamanaka Kumihimo Disk
192-524-AC: 6mm Antique Copper Bead Cap - 2 pieces
192-535-AC: Antique Copper Lobster Claw - 1 piece
192-512-AC: 6mm Antique Copper Jump Ring - 2 pieces
192-530-AC: Antique Copper Headpin with 2mm Ball - 2 pieces
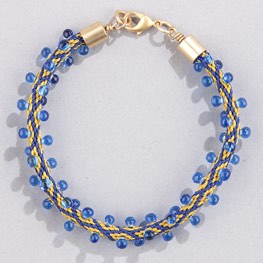
Climbing Bluebells
Materials:
DP-19: Miyuki 3.4mm Drop Silverlined Sapphire - 1 tube
CLC-AU: C-Lon Bead Cord Aurum - 1 bobbin
CLC-C: C-Lon Bead Cord Capri - 1 bobbin
MNT-05: Miyuki Gold Nylon Beading Thread - 1 bobbin
521-000: Hamanaka Kumihimo Disk
192-524-MG: 6mm Matte Gold Bead Cap - 2 pieces
192-535-MG: Matte Gold Lobster Claw - 1 piece
192-512-MG: 6mm Matte Gold Jump Ring - 2 pieces
192-530-MG: Matte Gold Headpin with 2mm Ball - 2 pieces