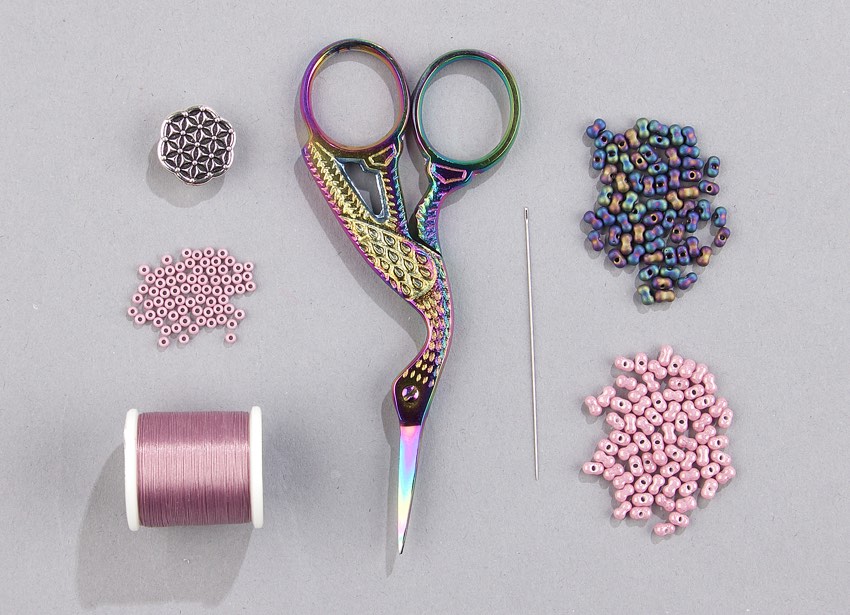
Materials:
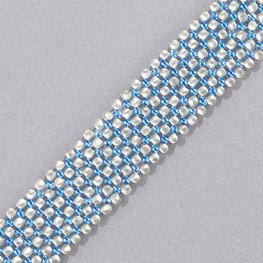
BB-401FR: Miyuki Matte Black AB Berry Bead (color B) - 2 tubes
BB-599: Miyuki Opaque Antique Rose Luster Berry Bead (color A) - 2 tubes
11-2037: Miyuki 11/0 Matte Opaque Antique Rose Seed Bead - 1 tube
MNT-18: Miyuki Rose Nylon Beading Thread - 1 bobbin
193-104: Japanese Thin Beading Needles
194-002-S: 15mm Silver Flower of Life Button - 1 piece
505-017: Rainbow Embroidery Bird Scissors
 Download a pdf of this project to read on your computer or tablet.
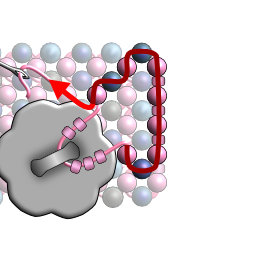
This project is made using Right Angle Weave.
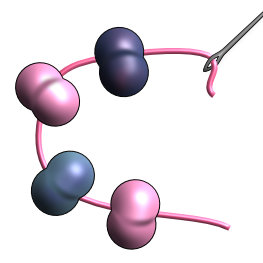
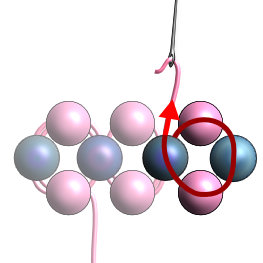
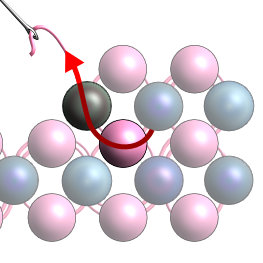
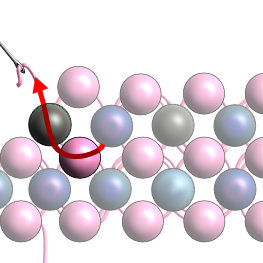
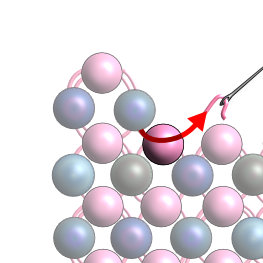
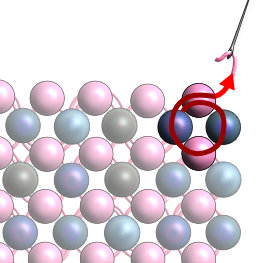
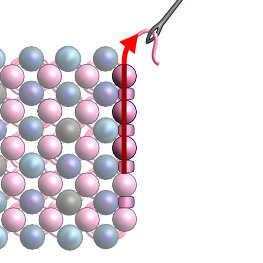
1. Cut a five foot length of Miyuki Nylon Beading Thread. String four Miyuki Berry Beads (BB) in alternating colors: color A, color B, color A, color B.
2. Make a loop by passing the needle back through the first BB, color A. Pull tight to secure leaving a thread tail of about 12 inches.
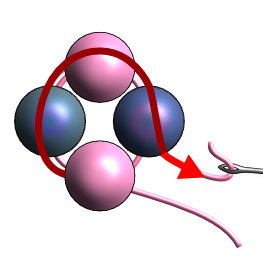
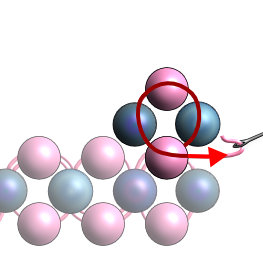
3. Moving clockwise, pass the needle through the next three BB, exiting BB (color B) on the right side of the loop.
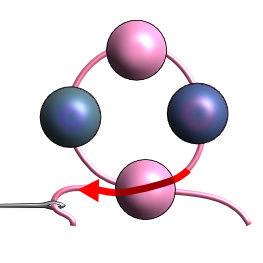
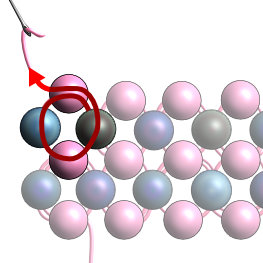
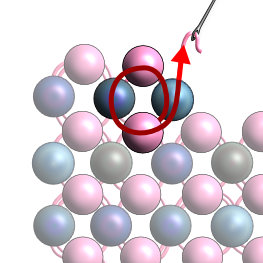
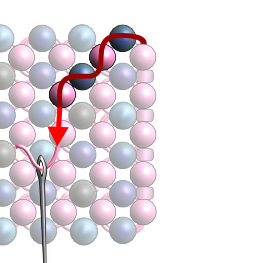
4. String three BB: color A, color B, and color A.
5. Turn and pass down through the same BB that was just exited in the first loop. The newly added beads now form a second loop connected to the first.
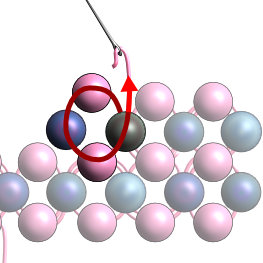
6. Moving counterclockwise pass through the next two BB in the second loop. This will position the thread for the next set of beads.
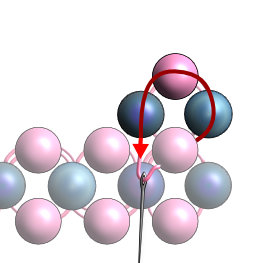
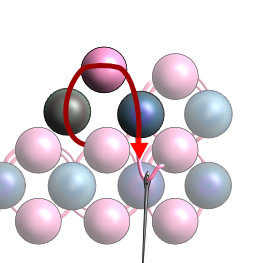
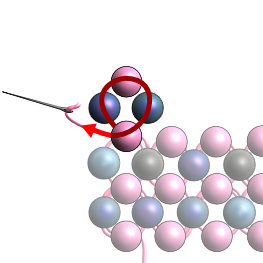
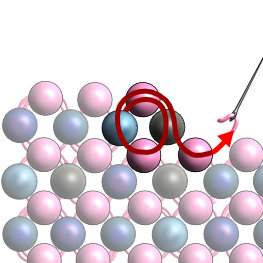
7. String three BB: color A, color B, and color A. Turn and pass up through the same BB that was just exited in the previous loop.
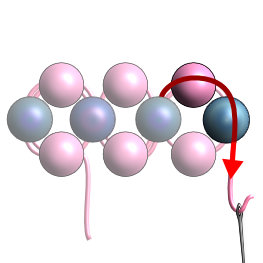
8. Moving clockwise pass through the next two BB, exiting BB (color B) on the right side of the newly added loop.
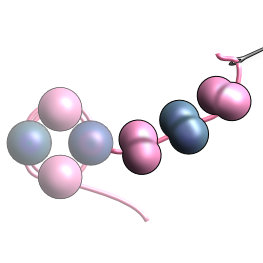
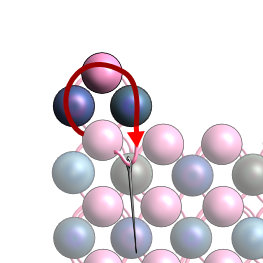
9. Repeat steps 4-6. Pull thread to secure.
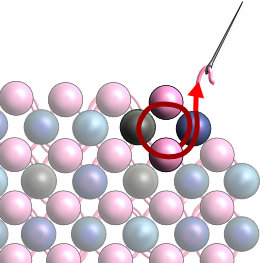
10. Repeat step 7. Continue through the next BB (color A) at the top of the loop. This completes row one.
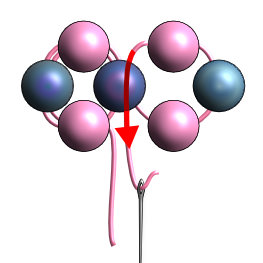
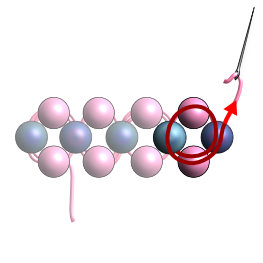
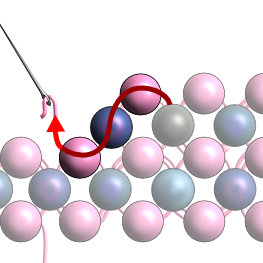
11. String three BB: color B, color A, and color B. Moving counterclockwise pass back through the BB (color A) that was just exited in row one. Pull thread to secure.
12. Moving counterclockwise pass through the next three BB in the loop exiting color B.
13. Moving from right to left pass through the next BB (color A) in the first row. The thread is now in position to add another set of beads.
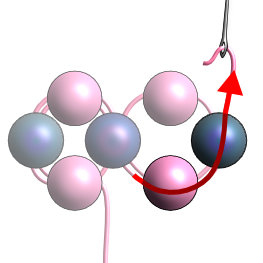
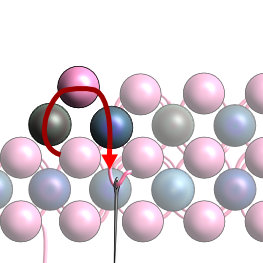
14. String two BB in color B and color A. Moving clockwise pass down through the next BB (color B). Pull to secure.
15. Moving clockwise pass through the next two BB in the loop exiting color B.
16. String two BB in color A and color B. Moving counterclockwise pass through the next two BB to form a loop.
17. Continue counterclockwise through the next two BB in the loop. Moving from right to left pass through the next BB (color A) from the first row.
18. Repeat step 14.
19. Repeat step 15.
20. Repeat step 16. Continue through the next BB (color A) at the top of the loop. This completes row two.
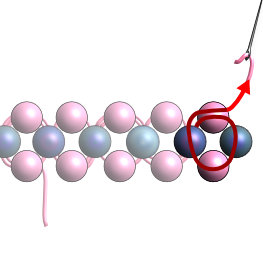
21. String three BB: color B, color A, and color B. Moving clockwise pass back through the BB (color A) that was just exited in row two. Pull thread to secure.
22. Moving clockwise pass through the next three BB in the loop exiting color B.
23. Moving from left to right pass through the next BB (color A) in the second row. The thread is now in position to add another set of beads.
24. String two BB in color B and color A. Moving counterclockwise pass through the next two BB to form a loop.
25. String two BB in color A and color B. Moving clockwise pass through the next two BB to form a loop. Continue clockwise through the next two BB exiting color B. Moving from left to right pass through the next BB (color A) in the second row.
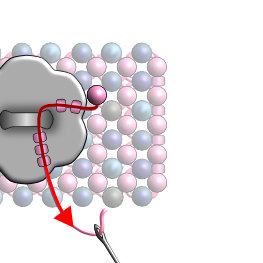
26. Repeat step 24.
27. String two BB in color A and color B. Moving clockwise pass through the next two BB to form a loop. Continue through the next BB (color A) at the top of the loop. This completes row three.
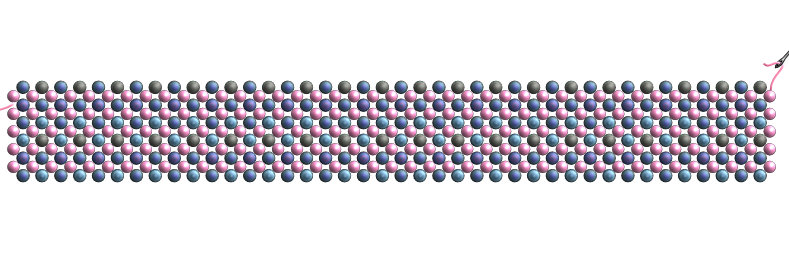
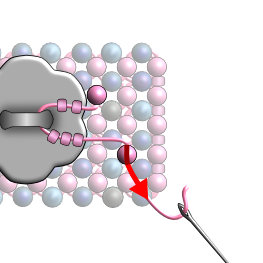
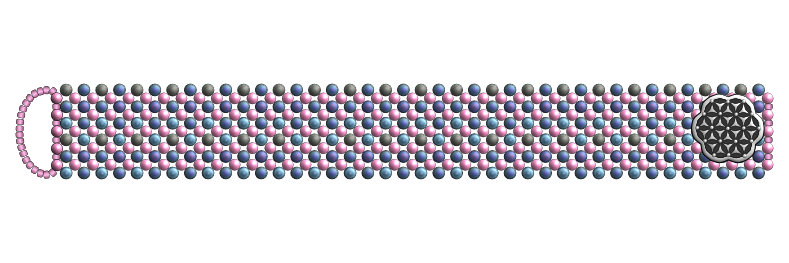
28. Continue working in right angle weave repeating steps 11-27. A woven section of 41 rows will measure approximately 6.5" with a finished length of 7" once the clasp is added.
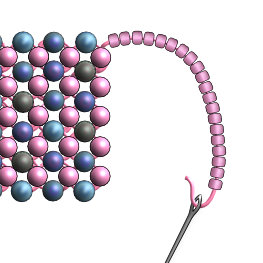
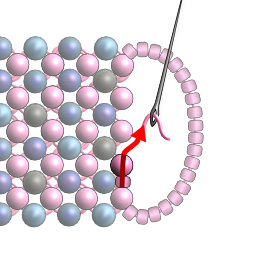
29. String twenty Miyuki 11/0 seed beads.
30. Pass up through the BB at the opposite end of the row to form a loop.
31. Add one 11/0 bead and pass through the next BB in the row.
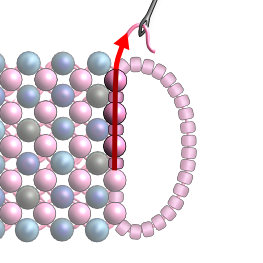
32. Continue along the row adding one 11/0 bead between each BB.
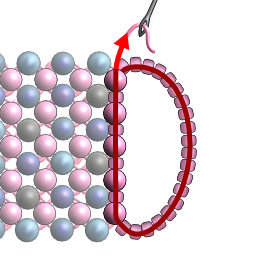
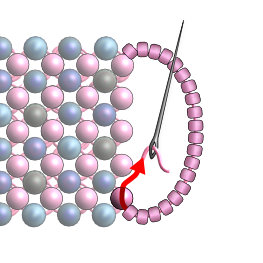
33. Pass through all the beads in steps 29-32. Repeat to reinforce.
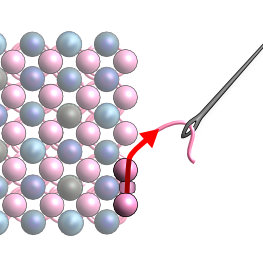
34. Move to the other end of the bracelet and attach the needle onto the thread tail. Add one 11/0 bead and pass through the next BB in the row.
35. Continue along the row adding one 11/0 bead between each BB.
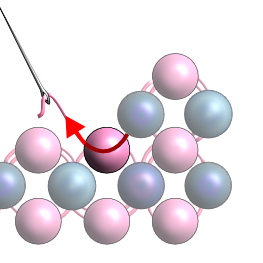
36. Follow the diagrammed thread path and exit the BB (color A).
37. String five 11/0 beads and pass through the shank of the button.
38. Pass through the BB (color A) as shown in the diagram.
39. Follow the diagrammed thread path to secure.
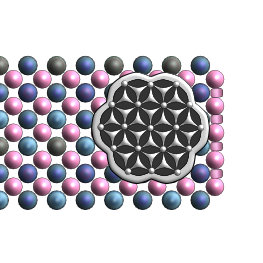
40. Reinforce the loop of 11/0 beads under the button.
41. Sew in and trim any loose threads.
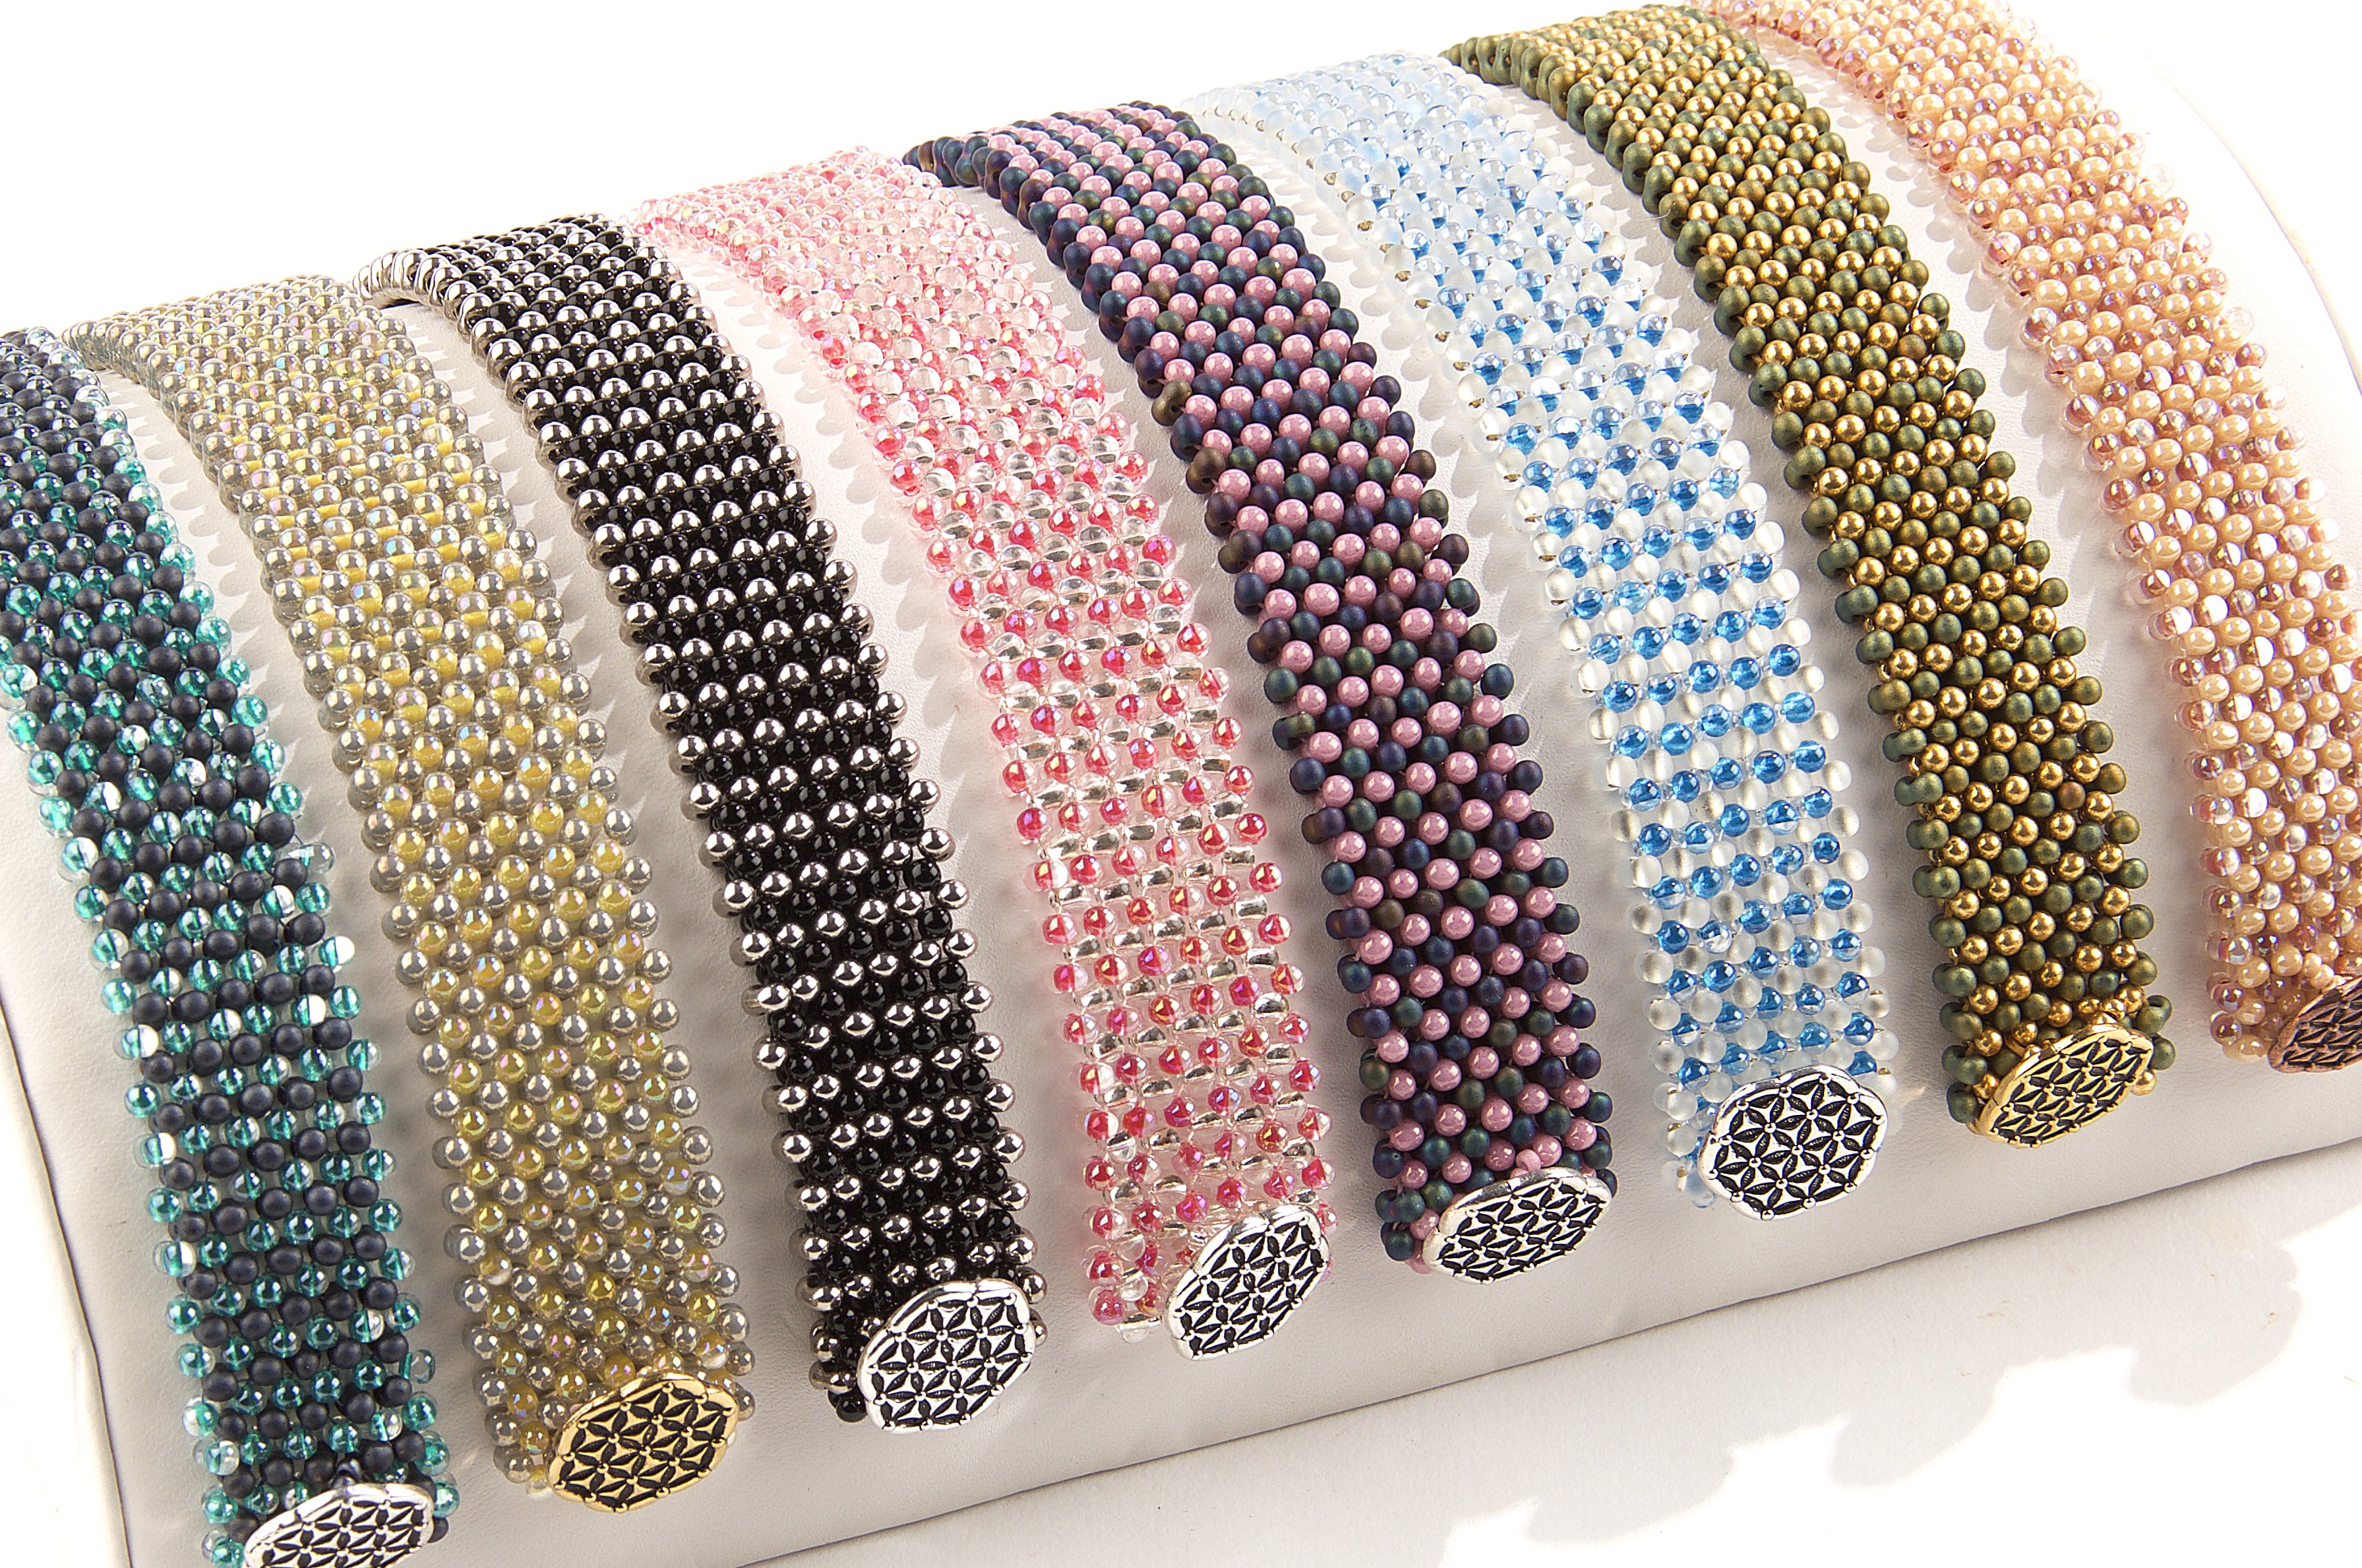
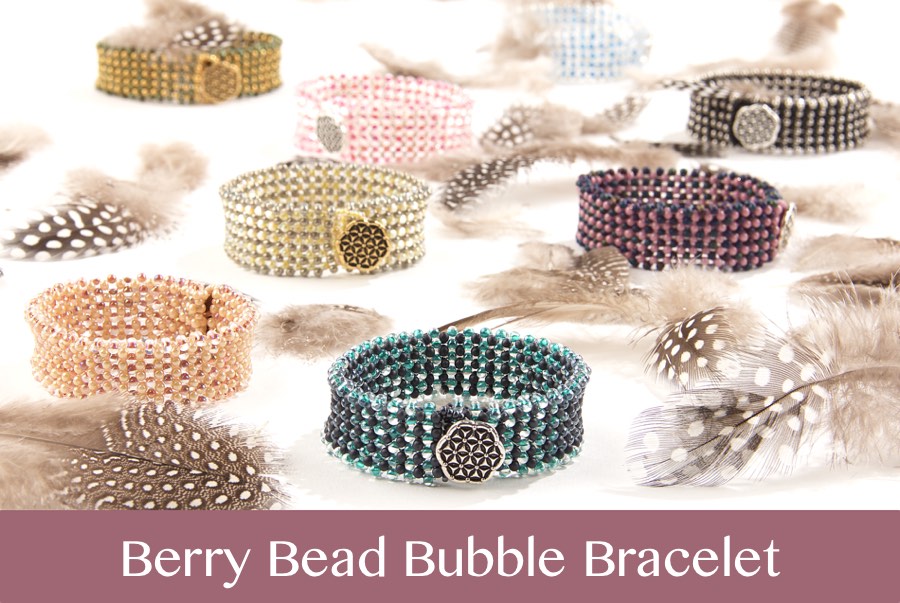
Colorways:
Alabaster
Materials:
BB-1529: Sparkle Sky Blue Lined Crystal Miyuki Berry Bead - 2 tubes
BB-1F: Matte Silverlined Crystal Miyuki Berry Bead - 2 tubes
11-1F: 11/0 Matte Silverlined Crystal Miyuki Seed Bead - 1 tube
CLBD-WH: C-Lon White Size D Beading Thread
193-104: Japanese Thin Beading Needles
194-002-S: 15mm Silver Flower of Life Button - 1 piece
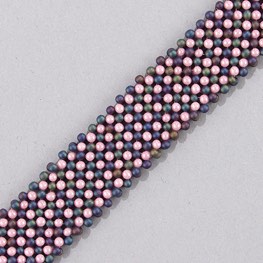
Basalt
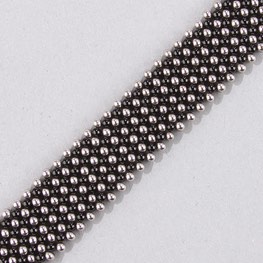
Materials:
BB-401: Black Miyuki Berry Bead - 2 tubes
BB-190: Nickel Plated Miyuki Berry Bead - 2 tubes
11-190: 11/0 Nickel Plated Miyuki Seed Bead - 1 tube
MNT-12: Black Miyuki Nylon Beading Thread
193-104: Japanese Thin Beading Needles
194-002-S: 15mm Silver Flower of Life Button - 1 piece
Granite
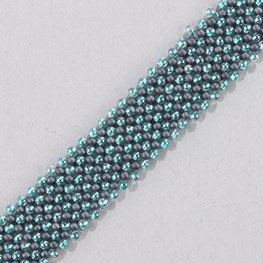
Materials:
BB-2001: Matte Gunmetal Miyuki Berry Bead - 2 tubes
BB-1528: Sparkle Aqua Green Lined Crystal Miyuki Berry Bead - 2 tubes
11-2011: 11/0 Matte Metallic Gunmetal Miyuki Seed Bead - 1 tube
MNT-17: Dark Blue Miyuki Nylon Beading Thread
193-104: Japanese Thin Beading Needles
194-002-S: 15mm Silver Flower of Life Button - 1 piece
Limestone
Materials:
BB-1865: Miyuki Opaque Smoke Gray Luster Berry Bead - 2 tubes
BB-273: Miyuki Light Yellow Lined Crystal AB Berry Bead - 2 tubes
11-273: Miyuki 11/0 Light Yellow Lined Crystal AB Seed Bead - 1 tube
MNT-13: Miyuki Yellow Nylon Beading Thread - 1 bobbin
193-104: Japanese Thin Beading Needles
194-002-G: 15mm Gold Flower of Life Button - 1 piece
Quartz
Materials:
BB-276: Miyuki Dark Coral Lined Crystal AB Berry Bead - 2 tubes
BB-1: Miyuki Silverlined Crystal Berry Bead - 2 tubes
11-1: Miyuki 11/0 Silverlined Crystal Seed Bead - 1 tube
MNT-04: Miyuki Blush Nylon Beading Thread - 1 bobbin
193-104: Japanese Thin Beading Needles
194-002-S: 15mm Silver Flower of Life Button - 1 piece
Sandstone
Materials:
BB-593: Light Caramel Ceylon Miyuki Berry Bead - 2 tubes
BB-275: Dk Peach Lined Crystal Aurora Borealis Miyuki Berry Bead - 2 tubes
11-593: 11/0 Light Caramel Ceylon Miyuki Seed Bead - 1 tube
MNT-04: Blush Miyuki Nylon Beading Thread Size B
193-104: Japanese Thin Beading Needles
194-002-C: 15mm Copper Flower of Life Button - 1 piece
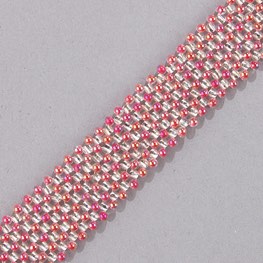
Slate
Materials:
BB-401FR: Miyuki Matte Black AB Berry Bead - 2 tubes
BB-599: Miyuki Opaque Antique Rose Luster Berry Bead - 2 tubes
11-2037: Miyuki 11/0 Matte Opaque Antique Rose Seed Bead - 1 tube
MNT-18: Miyuki Rose Nylon Beading Thread - 1 bobbin
193-104: Japanese Thin Beading Needles
194-002-S: 15mm Silver Flower of Life Button - 1 piece
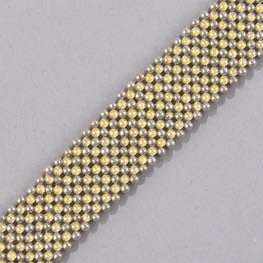
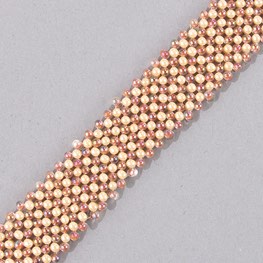
Travertine

Materials:
BB-2008: Miyuki Matte Metallic Patina Iris Berry Bead - 2 tubes
BB-4202: Miyuki Duracoat Galvanized Gold Berry Bead - 2 tubes
11-4202: Miyuki 11/0 Duracoat Galvanized Gold Seed Bead - 1 tube
MNT-05: Miyuki Gold Nylon Beading Thread - 1 bobbin
193-104: Japanese Thin Beading Needles
194-002-G: 15mm Gold Flower of Life Button - 1 piece